Showing posts with label Blogging Tips. Show all posts
0
[postlink]https://iamdaowner.blogspot.com/2012/07/off-page-seo-7-tips-on-how-to-build.html[/postlink]Well a site cannot get expected traffic without doing seo in the world of completion. After introducing on page seo. Now come back to introduce off page seo and basics of off page seo. As the word off page seo shows to do seo staying off from own page. Means to optimize a website from other sources. In simple a short we can define it as link building or creating backlinks. Off page seo helps site to get rank in search engines. 

Fairly Off page seo is to create and build backlinks from several of ways. Off page seo is a hungriness of backlinks.”There so many ways to do off page seo or creating backlinks but now, let me show you how to build links to your pages:
1. Profile Pages
Build Profile Pages in the top Social Media sites like:
Google+ Profiles-         https://profiles.google.com          (A Must)
Facebook Pages –         http://www.facebook.com/pages/            
Twitter Profiles-         http://twitter.com     
LinkedIn Professional Profiles – http://www.linkedin.com/company/professional-profiles                   
YouTube Channels –         http://www.youtube.com/channels            
Quora Profile –        http://www.quora.com 
About.me Profile –          http://about.me
2. Guest Posting  
Another powerful way to get backlinks is guest blogging.
In addition to building back-links to your site/page, it is an effective way to drive massive traffic to your website. So, if you are not using guest blogging as a link builder and instant traffic machine, I highly recommend that you start using it.
It is also advisable that you guest post in high traffic and preferably   authority sites in your niche.
Now, the obvious question that comes to your mind is hot to get these high traffic sites who accept guest blogging.
It is very simple …
Just use any of the following search queries in Google…
“Keyword Phrase” + “become a contributor” OR “contribute to this site”
“Keyword Phrase” + “guest article”
“Keyword Phrase” + “guest blog”
“Keyword Phrase” + “guest blogger”
“Keyword Phrase” + “Guest bloggers”  Let me show you with an example …
Let’s say that your website is about “investment”, then in order to find investment sites that accept guest blogging, enter the
following search query into Google search box
“Investment” + “guest blogger”
Once you hit the search button, you are going to get
Once you get the list of sites, scan each site to get the potential
sites that accept guest blogging.
Then browse the potentials sites to find out the guidelines on how to submit your guest post.
3. Directories  
Another way to build back-links to your site is to submit your site to web directories that aggregate links.
I would also like to point out that you focus on authority sites like DMOZ or web directories related to your niche.
Here are the search queries that you need to use to find web directories in your niche …
“Keyword Phrase” + “add a site”/”submit site”/”suggest site”
“Keyword Phrase” + “add URL”/”submit URL”/”suggest URL”
“Keyword Phrase” + “add listing”/”submit listing”/”suggest listing”
“Keyword Phrase” +”add your business”/”list your business”
“Keyword Phrase” + intitle:”directory”
“Keyword Phrase”+ inurl:”directory”
Let me illustrate with an example …
Let’s say that you have a site about “Skin care”, then to find potential sites for link building, enter the following search query into Google search box
“Skin care” + “add URL”/”submit URL”/”suggest URL”
Hit search and you are going get a list of sites to submit your link. Browse each potential site to find out on how to submit your link.
4. Blog Commenting
The other powerful way to drive instant traffic and links to your website is by commenting on other blogs.
Commenting is mainly aimed for 3 main purposes:
  • Drive instant traffic to your blog
  • Build a link
  • To establish a relationship with other blog owners.
The aggregate effect of commenting on other Blogs is paramount. Therefore, you need to find high traffic, preferably authority Blogs
which are related to your niche and  leave valuable and relevant comment.
As I have pointed out again and again, make sure to focus on blogs related to your niche and preferably high authority blogs.
The beauty of Blog commenting is …it is very simple.
Let me show the search query used to find blogs that allow commenting
“Keyword Phrase” + “add comment”  “Keyword Phrase” + “post comment”
“Keyword Phrase” + “leave comment”
Let me show you with an example …
Let’s say that you want to find blogs related to “weight loss”, then all you have
to do is to enter the following search query into Google search box
“Weight loss” + “add comment”
Once you hit search, you are going to get a list of blogs that allow blog commenting.
So, go and leave your comment …
5. Niche Forums 
Forums are great way to build back-links to your website. So, in this section, I
will show you simple ways to find forums that can help you build links to your
site.
But, I want to make very clear that …
You need to build links from forums in your niche. Don’t also forget about the
quality of the links we have discussed before.  Here are the search queries that
you need to use:
“Keyword Phrase” forum
“Keyword Phrase” discussion boards
“Keyword Phrase” “sign up OR register OR join”
“Keyword Phrase” “Powered by phpBB” OR “powered by vBulletin”
6. edu or .org Back-links ( Highly Recommended ) 
If you have been online for some time, most probably, you already aware that EDU back-links are very powerful way to boost your search engine ranking.
So, if you want to boost the search engine ranking of your site, make sure to build links form edu sites.
Let me show you how to easily find EDU back-links which are used by your competitors.
Please follow me …
For instance, if you want to find blogs for .edu back-links purposes, you can use
the following search query.
Site:.eduinurl:blog “post a comment”
And, if you want to get .org back-links, you can follow almost the same
procedures used to find .edu back-links.
Simply, Change .edu with .org
7. Re-Purposing Your Content 
The easiest way to get back-links quickly is to convert or re-purpose your
website content into another format.
Some of the ways are:
  1. Collect some of your website articles, compile and change them into PDF format. Then post to Scribd and Docstoc.
  2. Change your articles into power point presentations and submit them to        slide share document sharing sites.
  3. Change your articles into an audio series and submit it to or iTunes  (podcasts).
  4. Change your web content into video series and submit it to video hosting sites like Vimeo and YouTube.

Off-Page SEO – 7 Tips On How To Build BackLinks

0
[postlink]https://iamdaowner.blogspot.com/2012/07/5-tips-to-drive-lots-of-blog-readers.html[/postlink]
If you’ve ever created a blog before, then you know that the saying, “build it and they will come” just isn’t true. However, you can get more people interested in visiting your blog by following these five tips…
1. Offer good content.
By “good” content, I mean you should blog about topics that your audience wants to know about. To find out what they want, just follow these steps:
* Find out what types of information products they’re already buying – then write blog posts on the same topic.
* Use a keyword tool to find out what topics people in your niche are looking for.
* Drop by busy niche forums and other blogs to see which topics are generating the most views and discussion.
* Survey your readers to find out what they want.
2. Update frequently.
Sometimes people start a blog, post a flurry of articles and then abandon the blog for months at a time. If you allow dated posts, then your visitors aren’t likely to come back again if they notice that you don’t update regularly.
What you need to do is commit to posting to your blog at least once a week. If you don’t want to be chained to your blog like this, then create the content ahead of time and automatically “drip” it to your readers. Or, hire a ghostwriter to both create the content and post it.
Point is, you need to post often to keep your blog from looking like a deserted island.
3. Create regular features.
Here’s a great way to turn a one-time visitor into a repeat visitor. Specifically, by creating “regular features” and multi-part blog posts that your visitors can look forward to.
Example: Maybe you create a seven-part article about how to make money with pay per click marketing. And maybe you space it out so that you’re posting one or two articles per week. You can bet that your readers will return at least once a week just to finish reading the series.
Another way to get more visitors is by creating a regular feature, such as a “tip of the week” feature or even a “questions from our readers” feature.
4. Write about hot topics.
One way to get a surge of traffic and increase in your blog is by writing about hot or even controversial topics. You can include relevant keywords and “ping” the blog directories (like technorati.com) to make sure that those who are searching for the hot topic see your post.
Another way to leverage a hot topic is by joining in on the blogosphere conversation. Simply find a popular blog discussing a hot topic, and use a trackback to add your response.
5. Get someone influential to endorse your blog.
Finally, you can get others to visit your blog by first getting someone influential in your niche to endorse you (and your blog). You can do this indirectly, such as by offering to be a guest author on the other person’s blog. Or you can ask your joint venture partners to directly endorse you on their blogs and in their newsletters (and you’ll return the favor).
It’s free advertising. But it’s also extremely powerful, because you’re using social proof to increase your readership.
You just discovered five proven ways to get others to visit your blog – and to visit it again! Your next step is to take action.
Starting today, apply these tips… and then keep an eye on your traffic logs!
About the author: Hung Hong is a Mechanical Engineer from Vietnam.He spends most of his free time using internet and love to writing about Affiliate & Online Marketing, Blogging & Make Money Online. You can reach him through his personal website JVPrime.Com and HungMarketing.Com.

5 Tips To Drive Lots of Blog Readers

0
[postlink]https://iamdaowner.blogspot.com/2012/07/how-to-disable-right-click-in-your-blog.html[/postlink]
Here is an easy Procedure to to Disable Right Click in your Blog by disable right click in your blog it will protect your content not to copy


1.Go to www.Blogger.com >> Design >> Page Element >>> Add a Gadget >> HTML/JavaScript
   Now Paste Below Code Save it


<script language="JavaScript">
<!--  
//Disable right mouse click Script
//By Maximus (maximus@nsimail.com) w/ mods by DynamicDrive
//For full source code, visit http://www.dynamicdrive.com  
var message="Function Disabled!";  

///////////////////////////////////
function clickIE4(){
if (event.button==2){
alert(message);
return false;
}
}  
function clickNS4(e){
if (document.layers||document.getElementById&&!document.all){
if (e.which==2||e.which==3){ alert(message); return false;
}
}
}  
if (document.layers){
document.captureEvents(Event.MOUSEDOWN);
document.onmousedown=clickNS4;
}
else if (document.all&&!document.getElementById){
document.onmousedown=clickIE4;
}  
document.oncontextmenu=new Function("alert(message);return false")  
// -->
</script>


Now Your Done :)

How To Disable Right Click In your Blog

0
[postlink]https://iamdaowner.blogspot.com/2012/07/2-new-seo-friendly-blogger-templates.html[/postlink]
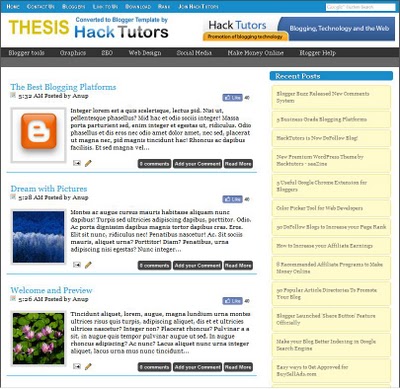
Thesis Blogger Template
Thesis Blogger Template is Most Used Template In 2011. Actually Thesis is a Word Press Theme it has been Converted into Blogger by Hack Tutors


                                                       Demo | Download


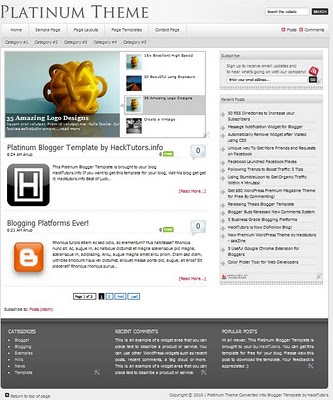
Platinum Blogger Template

PlatinuM Blogge Template is clean Looking Blogger Template Which can be used for any Categorie 


2 New SEO Friendly Blogger Templates Thesis And Platinum For Free

0
[postlink]https://iamdaowner.blogspot.com/2012/07/how-to-add-meta-tags-to-blogger.html[/postlink]
Want To get a Top ranking in search engines ? No Problem! All you need to do is add few magical "meta tags" to your web pages, and you'll skyrocket to the top of the listings.
 
META Tag Overview 

What are the Meta tags? 

They are information inserted into the "head" area of your webpages. Other than the title tag (explained below), information in the
head area of your web pages is not seen by those viewing you pages in browser, Instead, meta information in this area is used to communicate
information that human visitor may not be concerned with.Meta tags, for example can tell a browser what "Character set" to use 
or whether a web page has self-rated itself in terms of adult content.

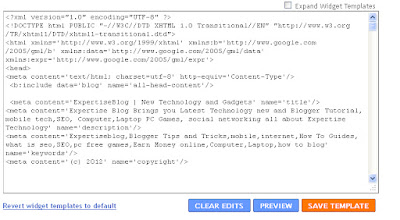
To Add Meta Tags in Blogger  Follow be the Sample Procedure

Go To blogger.com >> Design >> Edit HTML 

Find The below the Code

<b:include data='blog' name='all-head-content'/>


Edit this below the code with you Site Description, Keywords, 

<meta content='ADD YOUR SITE DESCRIPTION HERE' name='description'/>
<meta content='ADD YOUR KEYWORDS HERE' name='keywords'/>
<meta content='ADD YOUR NAME HERE' name='author'/>

after editing above the Code Paste the above code below of this
<b:include data='blog' name='all-head-content'/> 


Sample you Can in Below the Image


That's Its Now your Done :)

How To Add META Tags To blogger

0
[postlink]https://iamdaowner.blogspot.com/2012/06/featured-content-slider-for-blogger.html[/postlink]
Blogger is not more a blogging platform for beginners, there are lot more can be made with a blogger / blogspot blogs. Featured content sliders are seen in many WordPress blogs and when coming to blogger it is certainly not much seen. Here I am going to teach you, how to add a featured content slider to your blogger / blogspot blogs. Many thanks toWebdeveloperplus for making this code and I just tested and modified to work on blogger.
Featured Content Slider for Blogger Using jQuery
Step 1: Let get into the coding part. Here I just made a CSS stylesheet, to make the installation pretty simple. So all you need to do is just copy the below code and paste it after <head>
<link href='http://sites.google.com/site/bloggermintcom/style1.css' rel='stylesheet' type='text/css'/>
Step 2: If you need to change the dimensions of the slider you can use this step instead of step 1. Search for the code
]]></b:skin>
Now the place the below code before ]]></b:skin>
#featured{
width
:400px;
padding
-right:250px;
position
:relative;
border
:5px solid #ccc;
height
:250px;
background
:#fff;
}
#featured ul.ui-tabs-nav{
position
:absolute;
top
:0; left:400px;
list
-style:none;
padding
:0; margin:0;
width
:250px;
}
#featured ul.ui-tabs-nav li{
padding
:1px 0; padding-left:13px;
font
-size:12px;
color
:#666;
}
#featured ul.ui-tabs-nav li img{
float:left; margin:2px 5px;
background
:#fff;
padding
:2px;
border
:1px solid #eee;
}
#featured ul.ui-tabs-nav li span{
font
-size:11px; font-family:Verdana;
line
-height:18px;
}
#featured li.ui-tabs-nav-item a{
display
:block;
height
:60px;
color
:#333;  background:#fff;
line
-height:20px;
}
#featured li.ui-tabs-nav-item a:hover{
background
:#f2f2f2;
}
#featured li.ui-tabs-selected{
background
:url('http://i47.tinypic.com/6jojr4.jpg') top left no-repeat;
}
#featured ul.ui-tabs-nav li.ui-tabs-selected a{
background
:#ccc;
}
#featured .ui-tabs-panel{
width
:400px; height:250px;
background
:#999; position:relative;
}
#featured .ui-tabs-panel .info{
position
:absolute;
top
:180px; left:0;
height
:70px;
background
: url('https://blogger.googleusercontent.com/img/b/R29vZ2xl/AVvXsEhvJLzf8ydZ0kA0p9W2hcmFqQgxreH4DG8rZ3VZuZtVNLrZQvlSpIki9ixq1IYQu8ubRSfhGq9LYFELw4hVoTF72YqJ4pHbFz20V8AB0NGGNBiHSvhkfA0AspNzSqJD0QJ3maGcWMSEpVk/s1600/transparent-bg.png');
}
#featured .info h2{
font
-size:18px; font-family:Georgia, serif;
color
:#fff; padding:5px; margin:0;
overflow
:hidden;
}
#featured .info p{
margin
:0 5px;
font
-family:Verdana; font-size:11px;
line
-height:15px; color:#f0f0f0;
}
#featured .info a{
text
-decoration:none;
color
:#fff;
}
#featured .info a:hover{
text
-decoration:underline;
}
#featured .ui-tabs-hide{
display
:none;
}
Step 3: This step involves the featured content structure. Search for the code
<div id='content-wrapper'> and place the below code just before 
<div id='content-wrapper'>
<div id='featured'>
     
<ul class='ui-tabs-nav'>
         
<li class='ui-tabs-nav-item ui-tabs-selected' id='nav-fragment-1'><a href='#fragment-1'><img alt='pic1' src='http://i49.tinypic.com/e1aohv.jpg'/><span>Install Mac OS X on Intel/AMD PC using iATKOS v7</span></a></li>
         
<li class='ui-tabs-nav-item' id='nav-fragment-2'><a href='#fragment-2'><img alt='blogger' src='http://i438.photobucket.com/albums/qq108/fooble11/image2-small.jpg'/><span>How to remove &quot;showing post with label&quot; in Blogger</span></a></li>
         
<li class='ui-tabs-nav-item' id='nav-fragment-3'><a href='#fragment-3'><img alt='buzz' src='http://i438.photobucket.com/albums/qq108/fooble11/new1.jpg'/><span>How to add Google Buzz to Blogspot blog</span></a></li>
       
<li class='ui-tabs-nav-item' id='nav-fragment-4'><a href='#fragment-4'><img alt='chat' src='http://i50.tinypic.com/34xfg4m.jpg'/><span>Chat live with your blog visitors using Yahoo Pingbox</span></a></li>
     
</ul>
     
<!-- First Content -->
     
<div class='ui-tabs-panel' id='fragment-1' style=''>
       
<img alt='mac' src='http://i47.tinypic.com/rsbi80.jpg'/>
<div class='info'>
         
<h3><a href='#'>Install Mac OS X on Intel/AMD PC using iATKOS v7</a></h3>
         
<p>Description goes here, this is just a test description....<a href='http://www.bloggermint.com/2010/02/install-mac-os-x-on-intelamd-pc-using.html'>read more</a></p>
         
</div>
     
</div>
     
<!-- Second Content -->
     
<div class='ui-tabs-panel ui-tabs-hide' id='fragment-2' style=''>
         
<img alt='' src='http://i50.tinypic.com/33kprh5.jpg'/>
         
<div class='info'>
         
<h3><a href='#'>How to remove &quot;showing post with label&quot; in Blogger</a></h3>
         
<p>Description goes here, this is just a test description....<a href='#'>read more</a></p>
       
</div>
   
</div>
     
<!-- Third Content -->
     
<div class='ui-tabs-panel ui-tabs-hide' id='fragment-3' style=''>
         
<img alt='' src='http://i47.tinypic.com/2191lqt.jpg'/>
         
<div class='info'>
         
<h3><a href='#'>How to add Google Buzz to Blogspot blog</a></h3>
         
<p>Description goes here, this is just a test description....<a href='#'>read more</a></p>
         
</div>
     
</div>
     
<!-- Fourth Content -->
     
<div class='ui-tabs-panel ui-tabs-hide' id='fragment-4' style=''>
         
<img alt='' src='http://i48.tinypic.com/10pwp3o.jpg'/>
         
<div class='info'>
         
<h3><a href='#'>Chat live with your blog visitors using yahoo</a></h3>
         
<p>Description goes here, this is just a test description....<a href='#'>read more</a></p>
         
</div>
     
</div>  </div>
Replace the default image URL with your image URL. The bigger image dimension is 400 * 250 and for smaller its 80 * 50. Do insert your image with these dimensions, to make it look better. Also replace the text and link with your info.
Step 4: Now we need to initialize a script to play the slide show. For that we use this script. Place the below script just after <head>
<script type='text/javascript'>
$
(document).ready(function(){
$
(&quot;#featured&quot;).tabs({fx:{opacity: &quot;toggle&quot;}}).tabs(&quot;rotate&quot;, 5000, true);
$
(&quot;#featured&quot;).hover(
function() {
$
(&quot;#featured&quot;).tabs(&quot;rotate&quot;,0,true);
},
function() {
$
(&quot;#featured&quot;).tabs(&quot;rotate&quot;,5000,true);
}
);
});
</script>
Step 5: This is an optional step, if your blog already includes the jQuery and jQuery UI libraries. If not, follow this instructions. Copy the code below and paste it after <head>
<script src='http://ajax.googleapis.com/ajax/libs/jquery/1.3.2/jquery.min.js' type='text/javascript'/>
<script src='http://ajax.googleapis.com/ajax/libs/jqueryui/1.5.3/jquery-ui.min.js' type='text/javascript'/>
You are done, check to see the effect. If you have any troubles in executing this technique, drop in your comments. Click here to see the live demo

Featured Content Slider for Blogger Using jQuery

Grab the widget  IWeb Gator
Powered by Blogger.

Click the Like Button Below To Receive all updates via Facebook

Powered By Blogger Tricks |

Popular Posts